1/25
The Roman Dodecahedron is a curious puzzle, a strange object of which over 100 have been found, yet which have no contemporary mention to indicate what their function might have been. Many explanations for what they might have been have been proposed, but their purpose is still unknown.
3D printed models of these exist, but the shape isn't one that can be easily printed by a hobby filament deposition printer without a lot of awkward support material. This model is for parts which can be easily printed out on your home printer and then snapped together to make a reasonably accurate replica. The interior dimensions aren't accurate as I had to make space for the snap pins to hold the pieces together, but those probably aren't important to the item's function. The thru holes are clear and of accurate sizes, so you can still use this for holding candlesticks or tent pegs, or measuring distance by parallax, or as a form for knitting gloves, or whatever the actual function of these things was.
I used the following dimensions when making these files:
Edge length: 30mm
Height without corner knobs: 66mm
Height with corner knobs: 81mm
Hole sizes:
Face 1: 26.5mm
Face 2: 15.4mm
Face 3: 18.3mm
Face 4: 13.4mm
Face 5: 10.4mm
Face 6: 17.6mm
Face 1-prime: Ellipse 24.2mm x 25.1mm
Face 2-prime: 20.15mm
Face 3-prime: 8.7mm
Face 4-prime: 14.5mm
Face 5-prime: 20.6mm
Face 6-prime: 14.2mm
Print out one of each face (twelve total). Mark each face so you can keep track of which is which, this is important for getting the correct assembly.
Print out twenty of the corner pegs.
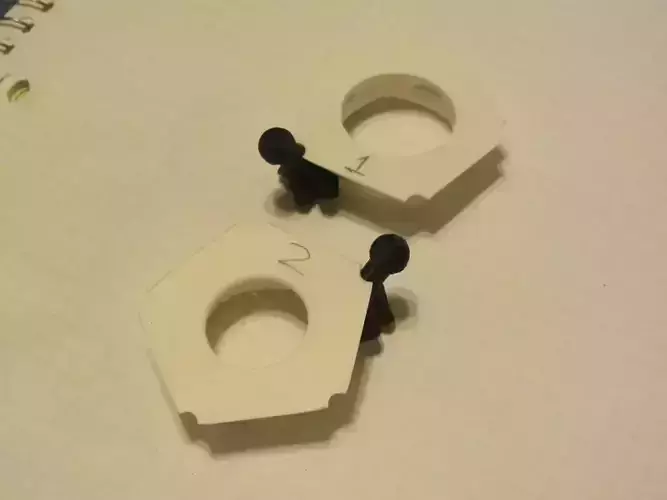
Each of the black pegs has three sets of protruding prongs, and each face has five sockets at the corners that the prongs on the corner pegs press into. The faces are all joined together at the corners by the pegs, with the round knobs on the pegs protruding out from the corners.
Start by pressing one corner peg into any corner of face 1 as shown. Do the same with another corner peg into any corner of face 2. Now press the two together, working the corner pegs into the corners of both pieces as shown. This is tricky to do, but they should hold securely once pressed together.
Do the same with faces 3-4 and 5-6, joining each pair together with two corner pegs.
Press one corner peg into the corner of face 1 opposite where face 2 is attached. Press another corner peg into the corner of face 3 opposite where face 4 is attached.
Now press pairs 1-2 and 3-4 as shown. There should be 4 pegs joining the two pairs together. Face 1 should be connected to faces 2,3,4, with the faces numbered counterclockwise around 1. Face 2 should be connected to faces 1 and 3, and face 4 should be connected to faces 1 and 3.
Press a connecting peg into the corner of face 5 which is opposite face 6, and another connecting peg into the corner of face 6 which is opposite face 5. Now press the face 5-6 pair into the other faces, such that face 6 is connecting to faces 1 and 2, and face 5 is connecting to faces 1 and 4.
This is the top half of the dodecahedron. Face 1 should be the center face, with faces 2 through 6 arranged around it. The face numbers should increase in number counterclockwise.
Now repeat the same process with faces 1-prime through 6-prime to make the bottom half. As with the top, 1 is in the center, and 2 through 6 are arranged around it with the numbers increasing counterclockwise.
Finally press the top and bottom halves together. Line them up such that 2-prime and 6 are opposite each other, 3-prime is opposite 5, 4-prime is opposite 4, 5-prime is opposite 3, and 6-prime is opposite 2. There are ten pegs which will have to be pressed into sockets to get the two halves joined, and they aren't easy to get apart once connected, so make sure you have all the faces in the right locations.
Now you have a replica Roman Dodecahedron. What to do with it is still quite the archaeological mystery.
REVIEWS & COMMENTS
accuracy, and usability.


