1/20
Stomp, stomp, stomp... Something is coming and I don't have a good feeling! The Crusher has just broken into the lines! Run!
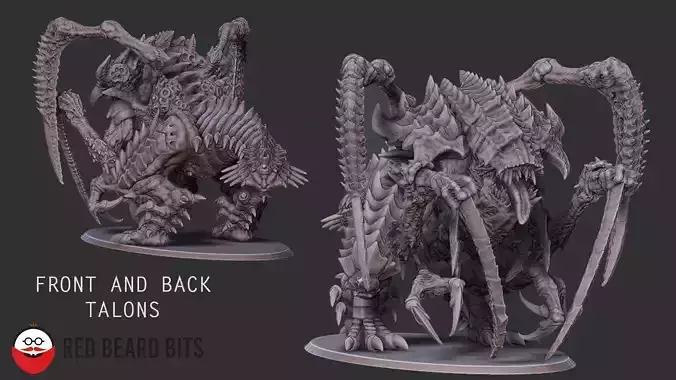
The Xenoteras Crusher has joined his not so cute friends, and it comes with some shiny set of talons and limbs that makes it a bit more posable than the rest. Making more limbs and ballpoint joints sacrifices some aesthetics, and that's why the model will need some extra work for assembly , like sandinf, filling and probably sculpting details once the pieces are together. These bits affect the talons, which I thought it's a good idea to give them some flexibility and dynamism.
What you will find inside the .Zip file is a set of folders containing the STL pieces for assembling the Crusher. Please take a look at the images to have an idea of what goes where. Any limbs or cannon will be only on the LEFT side, so once is supported you can just mirror it (this saves space). Inside you will find:-ArmCannon. Pieces to assembly the cannon. Is detailed enough in case you want to skip attaching the veins-ArmMainTalon. Pieces for doing ARMS, made by Arm and Forearm, which will be completed by any of the Talons of your choice. FOTalon means Flesh Over Talon, for that spikey and meaty type-ArmSupport. These arms go in the belly, to support the weight of the model and the shape. You can print the limbs separatedly or choose one of the already merged ones-ArmTopTalon. Same as the MainTalon, but these are longer and go in the back, also the Talon bits have a different joint. Comes with Small talons that go in the chest.-Hip and Tail. The hip has big room for fitting the legs, so you can wiggle them a bit. With 2 different tails.-Legs. Different types of legs that can be mirrored. They might go slighlty out of the base, but not by much.-Torso-Head-Carapus. The carapus bits come both right and left, due to the vents on their back. The Carapus head is optional, the head is detailed enough to go on its own. The Carapus in the neck has two options, one standard and one Acid.
The model is quite big, as you can see in the reference image, so you can always shrink it (or make it bigger why not), but if you do remember that the base is made for the original size (probably a bit smaller is still fine).
There are also some modifications on some pieces for people with smaller printer builds, and these are:-Leg over Ruin -Tail Turned Right-Torso
With those modifications you should be able to print everything, but if there are other pieces that you can´t print in a smaller plate and need me to split them, please ask.
Please note that this model is for personal use only. If you are interested on selling my models, please contact me privately
Happy printing!!
REVIEWS & COMMENTS
accuracy, and usability.


