1/8
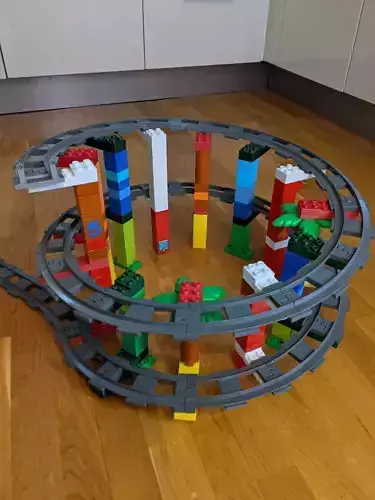
There's a limit to how many train track circles one can build in a small room - except if you go 3D!Then the only limit is the sky (or your ceiling?)...
It took some time to make all the calculations necessary for this, but finally they are here - the track supports to build a spiral as high as you want.
The spiral's layers are ~8 DUPLO bricks apart, so all the trains (the stock ones at least) should have plenty of space to fit under.Also, the incline is flat enough for the engine car to be able to carry a number of train cars going up.
Since one DUPLO track circle has 12 curves, the easiest way was to create 3 different kind of supports that repeat 4 times for one full circle.The 3 supports needed to be different so that they can raise the tracks by 2 bricks in 3 steps - in a way that you can use standard DUPLO bricks to build the rest, no need for anything else special (expect for these supports of course).
You might notice on the photos that some parts look different than the uploaded models. This is because I had to redo the design a few times, but I kept some of the usable older parts so that I can build higher!
Building instructionsOn the photos, you see a left-wind spiral, with support columns on the inside.You can do a right-wind spiral too, just put the columns on the outside.
So you'll need 4 of each kind printed for one full turn. The parts are numbered, but it's even better if you printed them in different colors.We'll be building upwards. Follow these steps (check the instructions picture too):
Take two curves, and connect them with a #1 under them.
Take a #2 with a DUPLO plate under it. Put them under the higher end of the two previous, then connect a third curve there.
Take a #3 with one DUPLO brick under it. Again, put them under the higher end of the three previous, then connect a fourth curve there. From here on, the instructions will repeat.
Take a new #1, and put two DUPLO bricks more than you had under the previous #1. Connect these to the higher end, and add a new curve.
Take a new #2, put two DUPLO bricks more than you had under the previous #2, and a plate. Connect these to the higher end, and add a new curve.
Take a new #3, put two DUPLO bricks more than you had under the previous #3. Connect these to the higher end, and add a new curve.
Repeat 4-6 until the next #1 would be right over the very first one.
From here on, regardless of which number is the next, just put 7 DUPLO bricks on the piece under, and a simiar piece on top & a new curve.
Repeat until you can.
The parts on the photos were made of noname PLA on a Prusa MK3S, 0.6mm nozzle, 0.30 mm layer height (with -2C ambient temperature and 130% feed rate).Yours will be much nicer.Beware of thermal contraction & printer tolerance though - even if the models are designed precisely to the microns, your filament & printer might trick you. LEGO (and injection molding) has much lower tolerance than 3D printing.I was lucky (?) because the PLA I used seemed to give the right 'clutch' with stock DUPLO parts. Maybe print one piece first, and see if it works well with your DUPLO - if not, adjust scaling a tiny bit.
Supports are not necessary. There are bridges, but assuming your printer is at least half-decent, you should be able print them without problems.Brim of at least 10mm is recommended due to small & thin bottom footprint, to avoid warping.
The center cylinder on the bottom for the 2x2 brick part has built-in horizontal supports that should be removed after printing - use a sharp knife.Those were necessary to avoid the center cylinder coming off during print - it's getting attached to the main body quite late during printing, so this helps keeping it in place until then.
REVIEWS & COMMENTS
accuracy, and usability.


