1/20
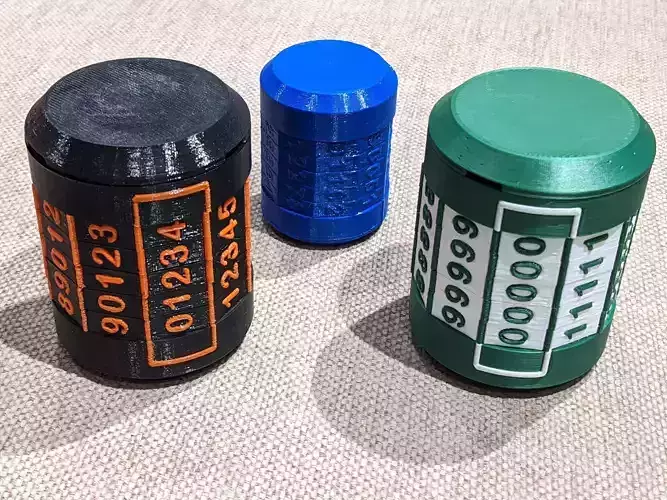
Container with lock, for all your hiding needs.
Note though, that the capsule is just as strong as the material you use, so don't expect it protect your gold reserves...
Features:
- 5-digit code to keep the contents safe
- adjustable code (by replacing / shuffling the rings)
- inner diameter 5cm & inner length 8cm
- ring snap mechanism for ensuring that the rings stop in the right position
- no supports needed for printing
- tested design using both PLA and PETG, down to 75% size
- models are usable for both single & multi-color printing
The combination that opens the capsule is determined by the rings. There are 10 different rings you can print, one for each number - so you need to decide what you want the combination to be, then print the right number of rings of the right kind. Each ring is marked with a small dot under the number it represents, but you can also determine this by aligning the ring's gap to the outer base's, and checking which number falls between the markers.
In addition to the rings, you will also need to print one of each part. There's also a lock cap key you can print to help you fasten the screw, in case you don't have a plier of the right size.
Assembly instructions (check the numbered pictures too):
Double-check and prepare the rings. Put them on each other in the order you want them to be, first number on the bottom, last on the top (on the pictures it's 56171), and check that their gaps are aligned with each other. Also check that when you align the gaps with the outer base's gap, the right numbers fall between the markers.
Take the first ring from the top (the last number) and slide it all the way in. It's easier if you rotate the ring so that one of the snap-thingys falls into the outer base's gap, then carefully pushing it in. When it's in place, rotate the ring so that the right number is between the markers, and check that the ring's gap is aligned with the outer base's gap. Try to rotate the ring, and see if it works properly. It should snap into place at each rotation, and should be relatively easy to turn. In case you feel that the ring is stuck, try to sand the inner surface of it after removing it from the base. If the snap mechanism appears too strong, you can try breaking off one of the snap-thingys.
Mount the rest of the numbers like the first one, double checking the gap alignments & rotation each time.
When all the rings are on, and rotated to the right combination, the inner base of the capsule should be able to slide all the way in.
Remove the inner base for now, so that the cap can be mounted by sliding it on the other end of the capsule.
Drop the cap screw inside the capsule, and use pliers (or the lock screw key) to fasten it in place. Depending on your print settings, this can require some force, hence pliers are recommended. The screw should be screwed all the way in, so that the cap doesn't move anymore.
Time to test! Make sure that you don't forget the combination, otherwise you won't be able to open the capsule without destroying it. Enter the right combination, and slide in the inner base, then rotate the rings to another combination. The capsule should be locked, the inner base shouldn't move.
Enter the right combination again, then you should be able to open the capsule. You're done!
The prototypes you see on the pictures were made on a Prusa MK3S printer with MMU2S, using a 0.6mm nozzle and 0.3mm layer height. For the colored ones, I printed 5 rings together (about 7hrs), then the outer base & cap (7hrs), finally the screw and the inner base (4hrs).
The models can be used both for single color & multi color prints, as the numbers slightly stick out from the surface of the rings. You can also decide to split the rings to parts, so that you can remove the numbers, making them embossed instead.
If you want a multi-color print, you also need to split the models, and set the parts' color to what you want them to be. It's best if you can hide the seams for the numbers & cogs on the inside, so that the surface of those will be much nicer. Same goes for the markers on the outer base & on the cap.
I tried printing both using PLA and PETG. The tolerances apperaed to be a bit tighter with PLA, but it was still fine. If your rings are hard to rotate, use a sandpaper on the inner side to make them slighly thinner & more slippery.
REVIEWS & COMMENTS
accuracy, and usability.


