1/12
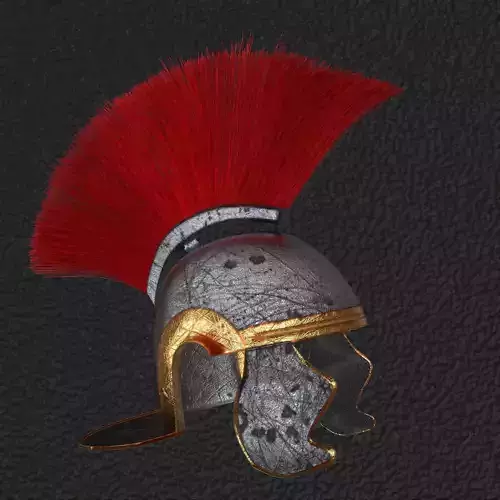
High quality/high-poly 3D model of a roman combat helmet.This is the helmet that Centurions used to wear in Roman Army. ( Centurion is a rank in Roman Army which is equivalent of a First Lieutenant in modern day.)
This helmet is literally all you need if you are working on a project Roman or Antique themed. I have no further explanation as the model literally explains itself the best way that it can be done.
Insturctions:
If you are a blender user ;
When you open the blend file it will look completely pink as the all textures are zipped in the Texture File. Go to shading tab> select the metal texture> ( in shading tab you will see different textures connected to Principled BSDF node ) click the folders icon in one of those textures node and select the texture in Texture File you downloaded, make sure that selected texture matches with the previous one. ( Example: if you've clicked the folder icon in the texture node that is named Color, you should choose the color texture from Textures File)Repeat the process for the gold texture.Change the shader type to World from Object in shader tab. Click the folders icon in environment texture node which is connected to background node.Choose the hdr file from Texture File to get the exact look in the images shown above.If not missed a step, you will be succesfully applied the both the textures and hdr.
After you succesfully applied the textures don't forget to save the file.Now you can append this model to your blend file that you are working on.(If you don't know how to append, watch tutorials on youtube)
You can also import the 3D object file (.obj or .fbx) to your blend file and texture it while it is there. (Texturing process is the same)But I wouldn't recommend this method because subdivision surface modifier is applied in .obj and .fbx files so If you use them it might be hard for your computer to process all those data.(Make sure you checked the number of verticies in product details before purchasing.)
More details about the blend file:
Blend File includes an extra object named paticlesystemusedinhelmet. I've used a particle system to generate the crest of helmet.But particle systems doesn't show up in .obj or .fbx files since they aren't mesh so I converted them into mesh to make sure everyone can use my model as the way it shows in images.If you want to use hair dynamics you have to convert it back into particle system which is not possible as I know.But you can copy the particle system in that extra object to helmet.( Particle System's name is ParticleSettings.004)
Delete the mesh named hair >Go to particle settings after you've copied the system> find vertex groups > click the density and choose GroupYou will genarate a hair by doing those steps but it wont look like the previous crest .That's because you have to edit that hair and give it a shape like crest.Select the helmet > Change the mode to Particle Edit from Object Mode You can edit your crest from there but if you don't know how to use Particle Edit, there are dozens of tutorials in youtube.( If you still can't give it a proper shape feel free to ask me)
ATTENTION !You don't have to do any of those steps in above if you don't want to use hair dynamics.Crest comes with the blend file seperated from the helmet as another object. You can use it without doing any setup.
If you are using a different software:
I honestly don't know how to use other softwares so I can't guide you the way.But I loaded .obj and .fbx files so I think you can download and use any of them easily no matter what software you are using.(.fbx file has metal and crest texture included in it but somehow I couldn't put the gold texture so you have to apply it yourself.)
If you have any issue please send message or e-mail me: blenderarcturus@gmail.com
REVIEWS & COMMENTS
accuracy, and usability.


